> ## Documentation Index
> Fetch the complete documentation index at: https://developers-partners.delivered.co.kr/llms.txt
> Use this file to discover all available pages before exploring further.

# 글로벌체크아웃 사용하기

> 글로벌체크아웃 기능을 웹사이트에서 제공하기 위해 컴포넌트를 추가하는 샘플 코드를 제공합니다.

## 1. 설치 가이드

### 1-1. 사용 방법

<Warning>
  **Order Action 기능**은 반드시 가맹점 웹사이트의 **상품 페이지와 장바구니 페이지**에 생성해야합니다.
</Warning>

<Check>
  **Order Tracking 기능**은 가맹점 웹사이트의 **메인 페이지**에 생성하는 것을 추천드립니다.
</Check>

각 컴포넌트는 두 가지 방식 중 하나를 선택하여 설치할 수 있습니다. 프로젝트의 구조나 선호도에 따라 적합한 방식을 선택하세요.

* **인라인 스타일 버전**: 별도의 CSS 파일 없이 HTML 파일 하나로 구성되어 있습니다.
* **HTML/CSS 분리 버전**: HTML과 CSS를 분리하여 관리할 수 있습니다.

### 1-2. 맞춤 설정

* **스타일 수정**: 브랜드 아이덴티티에 맞게 CSS를 수정하여 버튼이나 배경색 등을 변경할 수 있습니다.
* **로고 적용**: 컴포넌트 내에 있는 로고를 사용하기 위해 [🖼️ : 딜리버드 파트너스 로고](https://docs.google.com/uc?export=download\&id=1Yf3xxYK2ddDEIP4y4p27i8GNb3PIClzB) 링크를 통해 다운로드 받은 이미지를 적용해주세요.
* **동적 데이터 연결**: 샘플 코드의 정적 데이터 부분을 실제 사이트의 동적 데이터와 연결해야 합니다.
* **해외 사용 설정**: 글로벌체크아웃을 해외 사용자인 경우에만 로드하는 경우, [해외 사용 설정하기](/site-setting) 문서를 참고해주세요.

***

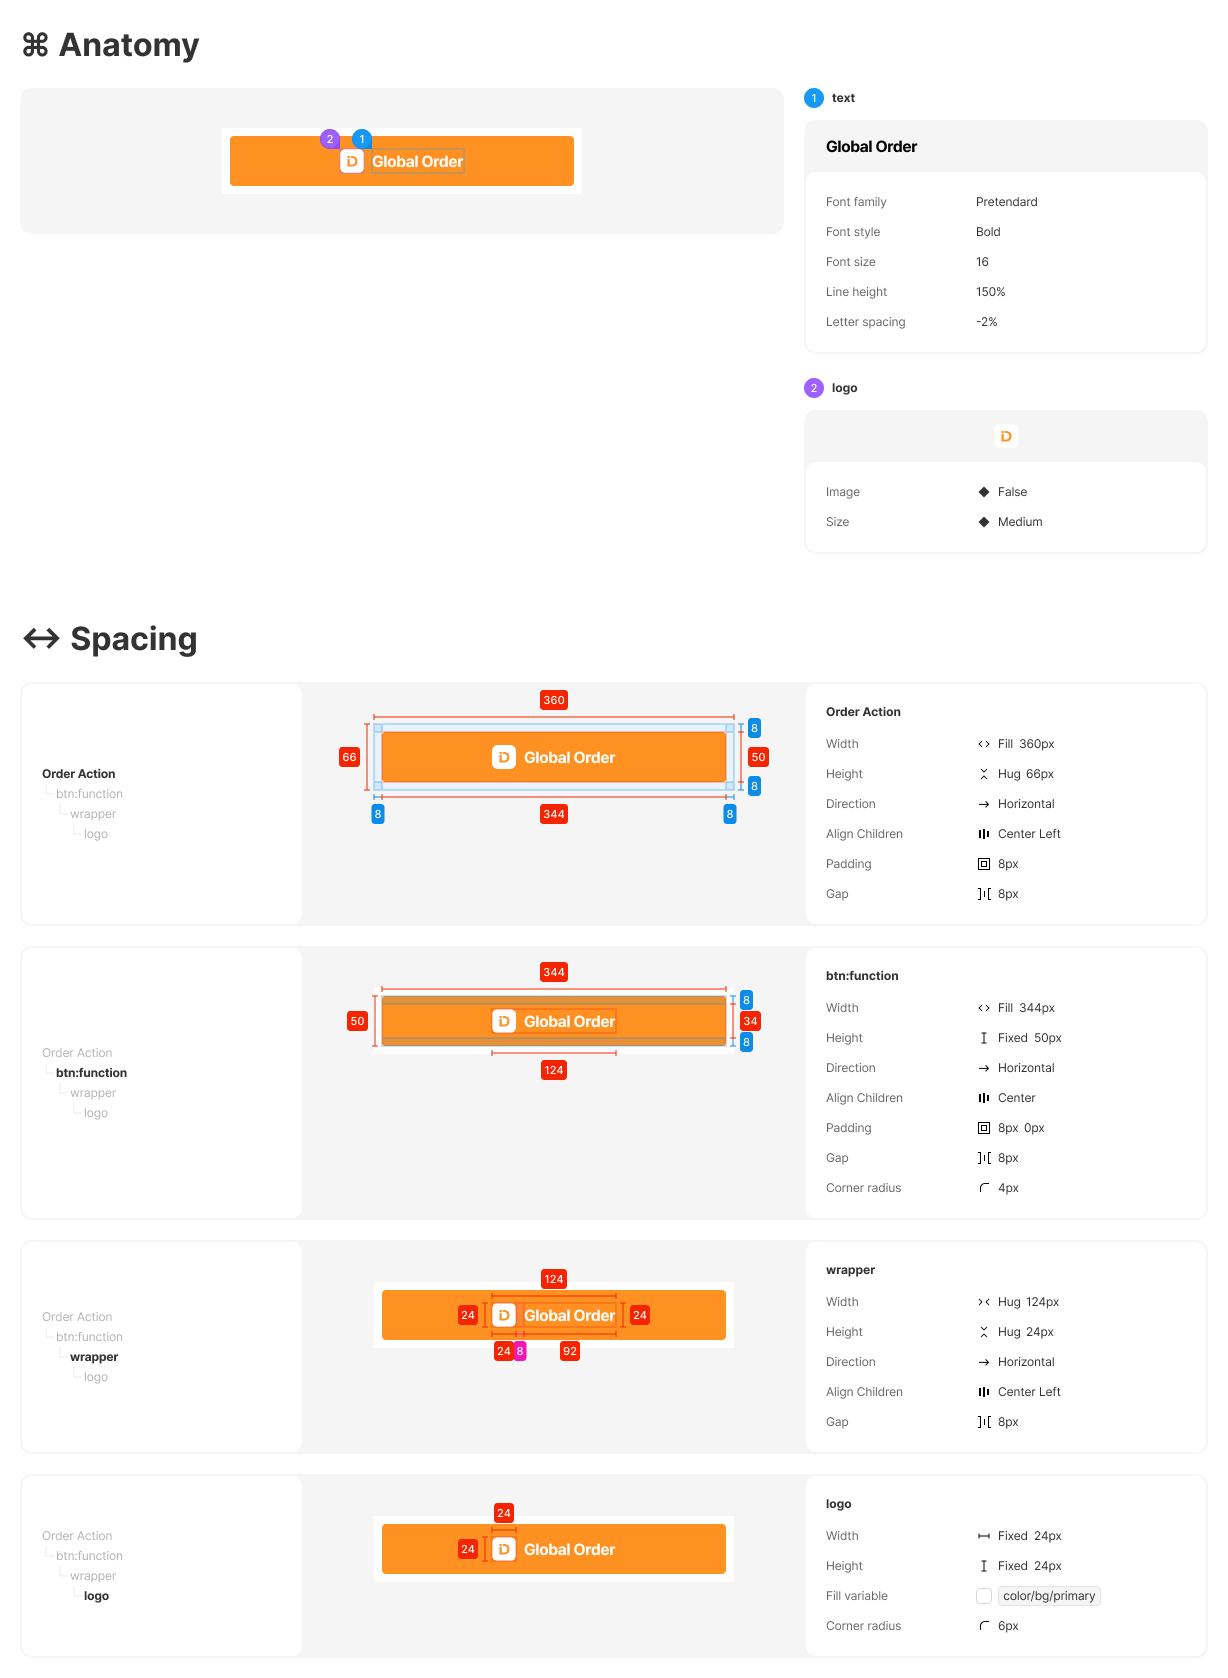
## 2. Order Action 컴포넌트

<Info>
  **해당 컴포넌트는 이해를 돕기 위한 샘플입니다.**

  링크와 함수가 가이드에 맞게 동일하게 동작한다면, 스타일은 자유롭게 수정하여 사용 가능합니다.
</Info>

<img src="https://mintcdn.com/deliveredkorea/qw6M9AVN3AeRpr_q/images/order-action.png?fit=max&auto=format&n=qw6M9AVN3AeRpr_q&q=85&s=542d0caca942c8f46e23a04652910d60" alt="" width="1228" height="1678" data-path="images/order-action.png" />

### 2-1. 기능

* 상품 페이지에서 글로벌체크아웃 주문서 생성 기능을 제공하는 버튼을 표시합니다.
* 버튼 클릭 시, 상품 정보를 전달하여 글로벌체크아웃 창이 나타나도록 합니다.
* 상품 정보를 전달하는 방법은 [통합형 SDK 연동하기](/integration-service/connecting)를 참고해주세요.

<Warning>
  **Order Action 기능**은 반드시 가맹점 웹사이트의 **상품 페이지와 장바구니 페이지**에 생성해야합니다.
</Warning>

### 2-2. 새 창 방식 (New Tab) 컴포넌트 코드

* 버튼 클릭 시, 글로벌체크아웃이 새로운 브라우저 탭에서 열립니다.
* `dkLibrary.orderInNewTab()` 메서드를 사용합니다.

<CodeGroup>
  ```html HTML theme={null}
  <html>
  <head>
  <link rel="stylesheet" href="order-action.css" />
  <link rel="stylesheet" href="https://cdn.jsdelivr.net/gh/orioncactus/pretendard/dist/web/static/pretendard.css" />
  <script src="https://sdk-checkout.delivered.co.kr/index.js"></script>
  </head>
  <body>
  <div class="order-action">
    <div id="globalCheckoutButton" class="order-action-button">
      <div class="button-content">
        <img src="img/logo.png" alt="Global Checkout Logo" class="logo" />
        <div class="order-text">Global Checkout</div>
      </div>
    </div>
  </div>

  <script>
    const products = [ // products 데이터 구조는 'SDK 연동하기' 문서 참고
      {
        productRequest: {
          sellerClientKey: 'your_seller_client_key',
          title: "프리미엄 티셔츠",
          prices: { krw: 29900 },
          discountRate: 0, // discountRate 사용하는 경우, originalPrices 필요
          originUrl: "https://example.com/products/premium-tshirt",
          images: ["https://example.com/images/tshirt-front.jpg"],
          options: [
            {
              groupName: "색상",
              type: "select",
              required: true,
              options: [
                { label: "흰색", extraPrice: { krw: 0 } },
                { label: "검정", extraPrice: { krw: 1000 } }
              ]
            }
          ],
          quantityControl: {
            allowQuantityChange: true,
            minQuantity: 1,
            maxQuantity: 10
          }
        },
        selectedOptions: [
          { groupName: "색상", value: "흰색" }
        ],
        quantity: 1
      }
    ];

    document.getElementById('globalCheckoutButton').addEventListener('click', () => {
      dkLibrary.orderInNewTab(products)
        .then(() => {
          console.log('주문 성공');
        })
        .catch((err) => {
          console.error('주문 실패:', err);
        });
    });
  </script>
  </body>
  </html>
  ```

  ```css CSS theme={null}
  .order-action {
    display: flex;
    align-items: center;
    background-color: #ffffff;
    gap: 8px;
    padding: 8px;
    width: 100%;
  }

  .order-action-button {
    display: flex;
    align-items: center;
    background-color: #ff9123;
    border-radius: 4px;
    flex: 1;
    gap: 8px;
    height: 50px;
    justify-content: center;
    cursor: pointer;
  }

  .button-content {
    display: flex;
    align-items: center;
    gap: 8px;
  }

  .logo {
    height: 24px;
    width: 24px;
  }

  .order-text {
    color: #ffffff;
    font-family: 'Pretendard-Bold', Helvetica;
    font-size: 16px;
    font-weight: 700;
    letter-spacing: -0.32px;
    line-height: 24px;
    white-space: nowrap;
  }
  ```
</CodeGroup>

### 2-3. 아이프레임 방식 (Iframe) 컴포넌트 코드

* 버튼 클릭 시, 글로벌체크아웃이 현재 페이지 내 iframe에서 열립니다.
* `dkLibrary.orderInIframe()` 메서드를 사용합니다.

<CodeGroup>
  ```html HTML theme={null}
  <html>
  <head>
  <link rel="stylesheet" href="order-action.css" />
  <link rel="stylesheet" href="https://cdn.jsdelivr.net/gh/orioncactus/pretendard/dist/web/static/pretendard.css" />
  <script src="https://sdk-checkout.delivered.co.kr/index.js"></script>
  </head>
  <body>
  <div class="order-action">
    <!-- 글로벌체크아웃 버튼 -->
    <div id="globalCheckoutButton" class="order-action-button">
      <div class="button-content">
        <img src="img/logo.png" alt="Global Checkout Logo" class="logo" />
        <div class="order-text">Global Checkout</div>
      </div>
    </div>

    <!-- 글로벌체크아웃 아이프레임 -->
    <iframe id="orderIframe"></iframe>
  </div>

  <script>
    // 주문 정보 객체
  const products = [ // products 데이터 구조는 'SDK 연동하기' 문서 참고
      {
        productRequest: {
          sellerClientKey: 'your_seller_client_key',
          title: "프리미엄 티셔츠",
          prices: { krw: 29900 },
          discountRate: 0, // discountRate 사용하는 경우, originalPrices 필요
          originUrl: "https://example.com/products/premium-tshirt",
          images: ["https://example.com/images/tshirt-front.jpg"],
          options: [
            {
              groupName: "색상",
              type: "select",
              required: true,
              options: [
                { label: "흰색", extraPrice: { krw: 0 } },
                { label: "검정", extraPrice: { krw: 1000 } }
              ]
            }
          ],
          quantityControl: {
            allowQuantityChange: true,
            minQuantity: 1,
            maxQuantity: 10
          }
        },
        selectedOptions: [
          { groupName: "색상", value: "흰색" }
        ],
        quantity: 1
      }
    ];

  // 버튼 클릭 이벤트 리스너
    document.getElementById('globalCheckoutButton').addEventListener('click', async () => {
      try {
        const response = await dkLibrary.orderInIframe({
          products,
          parentUrl: `https://example.com/iframe-page?url=`,
        });

        const iframe = document.getElementById('orderIframe');
        iframe.src = response;
      } catch (err) {
        console.error('주문 실패:', err);
      }
    });
    // 메시지 이벤트 리스너
    window.addEventListener('message', (event) => {
      const { type, payload } = event.data;

      if (type === 'dk-global-order-go-to') {
        window.location.replace(payload);
      } else if (type === 'dk-resize-iframe') {
        const iframe = document.getElementById('orderIframe');
        iframe.style.height = `${payload.height}px`;
      } else if (type === 'dk-global-order-delete-product') {
        // 상품 삭제 로직 실행
        // payload는 sdk에 넘겨주신 sellerProductId 입니다.
        // ex. {type: 'dk-global-order-delete-product', payload: '1'}
      }
    });
  </script>
  </body>
  </html>
  ```

  ```css CSS theme={null}
  .order-action {
  display: flex;
  flex-direction: column;
  align-items: center;
  background-color: #ffffff;
  gap: 8px;
  padding: 8px;
  width: 100%;
  }

  .order-action-button {
  display: flex;
  align-items: center;
  background-color: #ff9123;
  border-radius: 4px;
  flex: 1;
  gap: 8px;
  height: 50px;
  justify-content: center;
  cursor: pointer;
  }

  .button-content {
  display: flex;
  align-items: center;
  gap: 8px;
  }

  .logo {
  height: 24px;
  width: 24px;
  }

  .order-text {
  color: #ffffff;
  font-family: 'Pretendard-Bold', Helvetica;
  font-size: 16px;
  font-weight: 700;
  letter-spacing: -0.32px;
  line-height: 24px;
  white-space: nowrap;
  }
  ```
</CodeGroup>

***

## 3. Top Bar (Order Tracking) 컴포넌트

<Info>
  **해당 컴포넌트는 이해를 돕기 위한 샘플입니다.**

  링크와 함수가 가이드에 맞게 동일하게 동작한다면, 스타일은 자유롭게 수정하여 사용 가능합니다.
</Info>

<img src="https://mintcdn.com/deliveredkorea/qw6M9AVN3AeRpr_q/images/top-bar-order.png?fit=max&auto=format&n=qw6M9AVN3AeRpr_q&q=85&s=f32e85aed402540519ffdd453fc0b5f3" alt="" width="1228" height="1780" data-path="images/top-bar-order.png" />

* **설치 조건**: 글로벌체크아웃 SDK 설치 완료
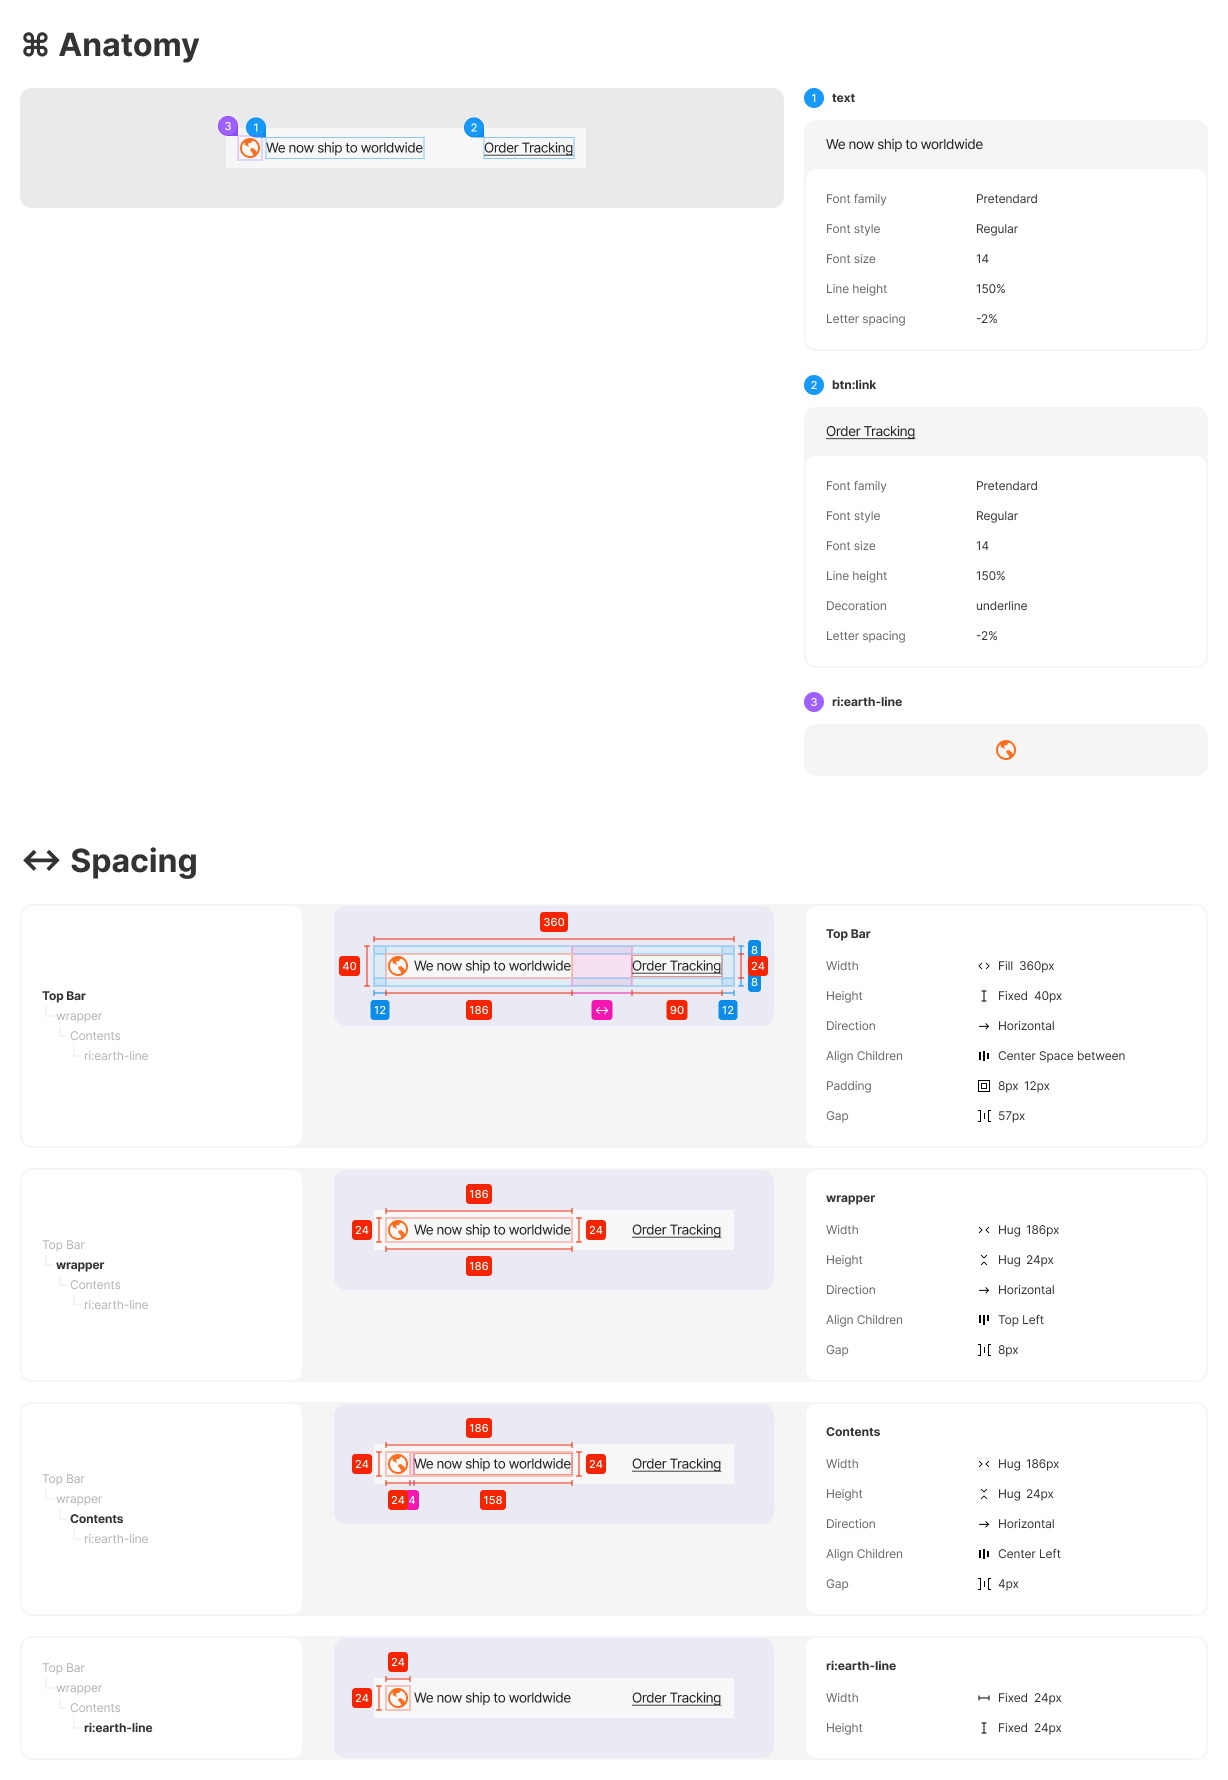
### 3-1. 기능

* 메인 페이지 상단에 "Order Tracking" 링크와 "We now ship to worldwide" 메시지를 표시합니다.
* 링크 클릭 시, [주문 조회](https://checkout.delivered.co.kr/order/tracking/entry)  페이지로 이동하여 사용자가 주문 상태를 확인할 수 있습니다.

### 3-2. 컴포넌트 코드

<Check>
  **Order Tracking 기능**은 가맹점 웹사이트의 **메인 페이지**에 생성하는 것을 추천드립니다.
</Check>

<CodeGroup>
  ```html HTML theme={null}
  <html>
  <head>
    <link rel="stylesheet" href="top-bar-order-tracking.css" />
    <link rel="stylesheet" href="https://cdn.jsdelivr.net/gh/orioncactus/pretendard/dist/web/static/pretendard.css" />
  <link
      href="https://cdn.jsdelivr.net/npm/remixicon@4.5.0/fonts/remixicon.css"
      rel="stylesheet"
  />
  </head>
  <body>
    <div class="top-bar-order-tracking">
      <div class="tracking-content">
        <i class="ri-earth-line ri-2x" style="color: #FC6E1D;"></i>
        <p class="tracking-text">We now ship to worldwide</p>
      </div>
      <a href="https://checkout.delivered.co.kr/order/tracking/entry" class="order-tracking-link">Order Tracking</a>
    </div>
  </body>
  </html>
  ```

  ```css CSS theme={null}
  .top-bar-order-tracking {
    display: flex;
    align-items: center;
    background-color: #f6f6f6;
    height: 40px;
    justify-content: space-between;
    padding: 8px 12px;
  }

  .tracking-content {
    display: flex;
    align-items: center;
    gap: 8px;
    max-width: calc(100% - 90px);
  }

  .tracking-icon {
    height: 24px;
    width: 24px;
  }

  .tracking-text {
    color: #232323;
    font-family: 'Pretendard-Regular', Helvetica;
    font-size: 16px;
    margin: 0;
  }

  .order-tracking-link {
    color: #232323;
    font-family: 'Pretendard-Regular', Helvetica;
    font-size: 16px;
    text-decoration: underline;
  }
  ```
</CodeGroup>
